
welcome to the fold

Like real-life orchids, orchid-gami models are made of delicate material and the hints that follow will help you enjoy the process of model construction. Take your time and follow the instructions. Orchid-gami is not hard, but success takes a bit of patience.
Choosing a model
Which model to choose? Start with a model that has a one or two star rating. These are easy to build and most don't require glue. Do the more difficult 4 and 5 star models later! You can also pick models based on their appeal, and you can engage a group effort to help each other.
Getting ready
Gather all the required materials before construction. To create any of the orchid-gami models, you will need:
- The printed orchid-gami sheet which includes diagrams for each model and photos of the completed orchid.
- Fast-drying and colorless Glue is best but any glue will do. Some folks prefer to use clear tape instead.
- Tweezers make it easier to handle small pieces, especially when applying glue and putting model parts in place.
- A Pencil can be used to make nice curls. If you have never curled paper before, practice to get a feel for it. An orange arrow indicates where curling will be needed.
- An optional tool is a bone-folder for making a sharp crease or fold. You can find this on the internet or at your local art supply store. But any straight edge, such as a ruler, also works well.
STEP 1: Punch out the shapes and pre-fold them
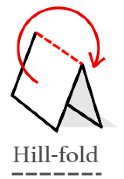
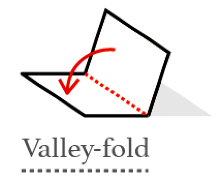
Carefully punch out the pieces and organize them. Letters on the sheet show where each piece goes as you build the model. Many pieces have two types of dashed lines on them that indicate where you make folds. At the beginning, spend a little time learning the difference between the Hill and Valley folds.
STEP 2: Glue

Now for the fun part. Numbers come in pairs and similar numbers are glued together. Glue the numbers in the order shown on each piece. Red circles indicate where you need to be careful. The tweezer symbol shows where it would be a good idea to use them. If glue does not work well, you can also secure pieces in place with clear tape.


STEP 3: Curling
You are almost finished! Let the glue dry a bit then your model is ready for that final touch. Gently curl the leaf and flower tips to mimic the way the orchid appears in nature.

STEP 4: Enjoy!
Congratulations! It’s time to show how artistic you are. Put your model in a nice spot. It won’t need water (and hates fire). While enjoying the model, we encourage you to learn more about your orchid by scanning the QR code with your phone or visit the species page on NAOCC's Go Orchids website: goorchids.northamericanorchidcenter.org